Introduction
Integrating a custom Model Context Protocol (MCP) server with Copilot Studio agents opens up new possibilities for organizations leveraging Microsoft 365 Copilot and Teams. This article guides you through the process of creating, deploying, and extending an AI agent with specialized skills, using MCP and Copilot Studio as the foundation. Whether you are a low-code enthusiast or a professional developer, you’ll find practical steps and insights to help you build robust, action-oriented agents tailored to your enterprise needs.
Understanding Agent Types in Copilot Studio
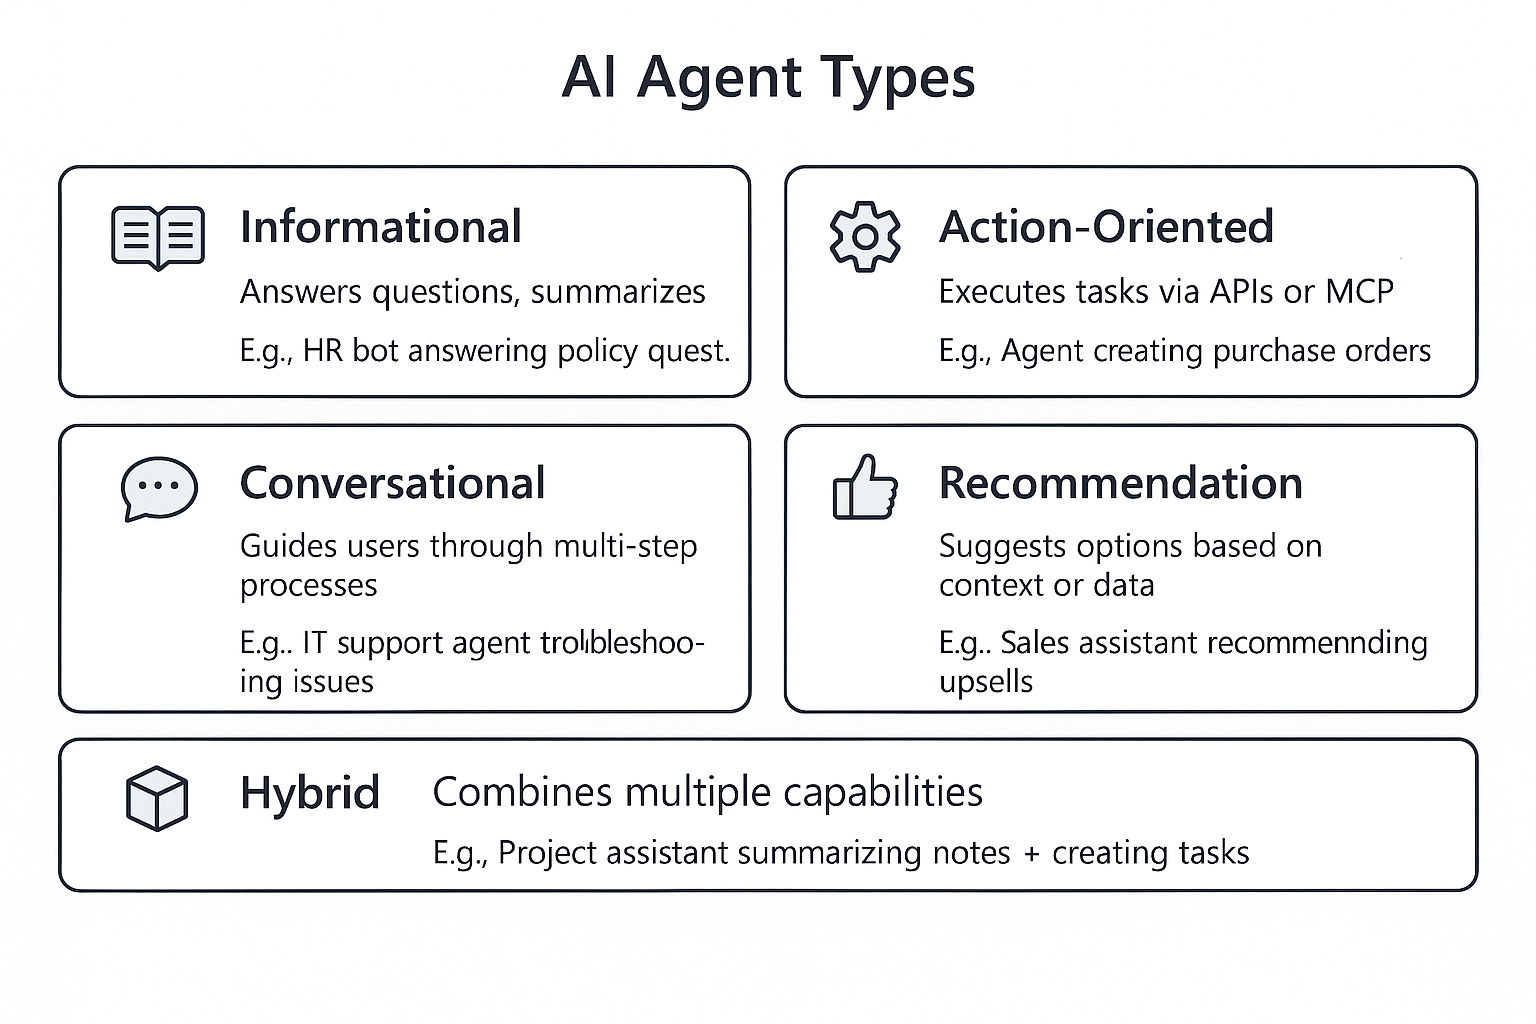
The diagram below illustrates the main types of agents you can build in Copilot Studio. Each type is tailored for specific tasks, ranging from answering questions and providing recommendations to executing automated actions and guiding users through processes. This simplified visual overview helps you quickly identify which agent type best fits your business.
In this post, we focus on the action-oriented agent type, which leverages an existing Azure DevOps MCP server implementation to extend capabilities and automate workflows. You can find the source code and deployment instructions for the MCP server in the following GitHub repository:
https://github.com/heluxenhofer/mcp-server-azure-devops
Hosting Your MCP Server in Azure
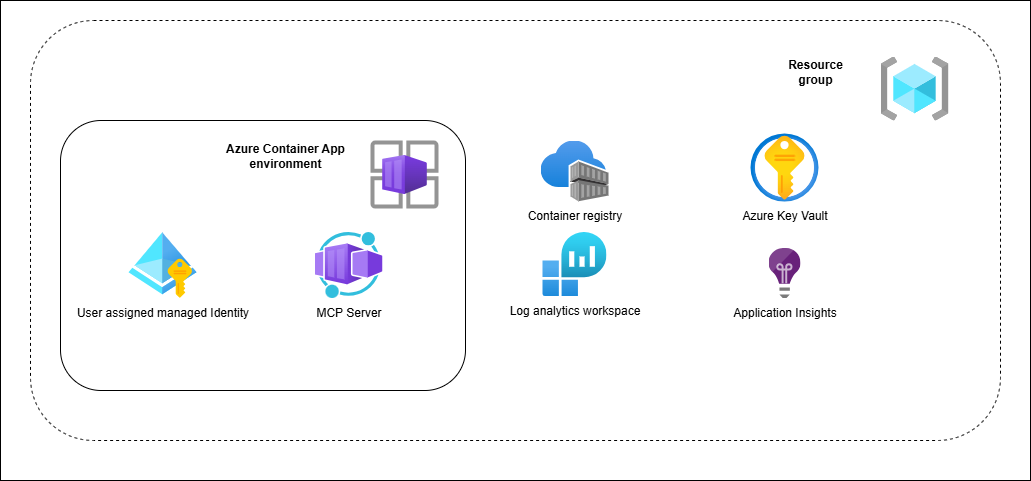
To make your MCP server accessible to Copilot Studio agents, you first need to prepare your server code for deployment in Azure. Using the Azure Developer CLI, you can deploy your MCP server to an Azure Container App Environment. The process is straightforward: clone the example repository from GitHub, follow the instructions in the README, and configure your deployment. The resulting architecture includes managed identity, a container registry, Azure Key Vault, and Application Insights for monitoring. This setup ensures your MCP server is secure, scalable, and ready for enterprise use.
Agent with MCP in Copilot Studio
Once your MCP server is running in Azure, the next step is to integrate it with Copilot Studio. Begin by manually configuring your agent in Copilot Studio, enabling generative AI orchestration mode to allow dynamic tool selection. For best results, disable general knowledge and web search features so your agent remains focused on its core tasks.
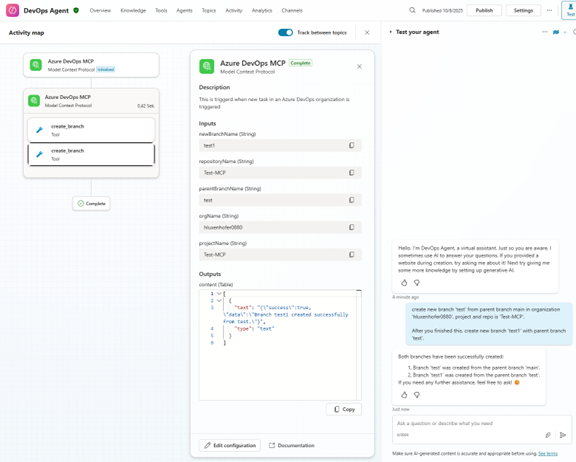
When defining your agent’s instructions, clarity is key. For example, you might specify that your agent is an Azure DevOps assistant, designed to help developers perform specific tasks using Azure DevOps tools. The agent should be able to retrieve available MCP tools, summarize them for users, and guide them through actions such as creating new branches. It’s important to ensure the agent politely declines unrelated requests and maintains a friendly, engaging tone throughout interactions.
Example instructions can be found in GitHub Repo here.
Tip: Take care to name referenced tools in your instructions like in configuration.
If you aren`t familiar with creating agents in Copilot Studio, just follow instructions on Microsoft documentation Quickstart: Create and deploy an agent - Microsoft Copilot Studio | Microsoft Learn.
Monitoring and Insights
Monitoring is essential for maintaining high-quality, production-ready agents. Azure Application Insights provides comprehensive visibility into both your MCP server and Copilot Studio agents. By integrating Application Insights, you can track performance metrics, user interactions, and potential issues, enabling continuous improvement and reliable operation. Application Insights can be set up under Settings-Advanced
Integrating the MCP Tool in Copilot Studio
Initiating the MCP Tool Integration
Begin by opening your agent configuration in Copilot Studio and selecting the option to add a new tool. Choose “Model Context Protocol (MCP)” as the integration type. The onboarding wizard will guide you through the required steps. For a comprehensive walkthrough, refer to the official documentation:
https://learn.microsoft.com/en-us/microsoft-copilot-studio/mcp-add-existing-server-to-agent
Configuring the MCP Server Endpoint
During setup, you will be prompted to provide the endpoint of your MCP server. For this post, the integration leverages an existing Azure DevOps MCP server implementation, available at:
https://github.com/heluxenhofer/mcp-server-azure-devops
Ensure your MCP server is deployed and accessible from the Copilot Studio environment, see section Hosting.
Setting Up Secure Authentication
Security is essential when integrating enterprise tools. Select Microsoft Entra ID (OAuth 2.0) as the authentication method. You will need to enter the Client ID, Client Secret, Authorization URL, Token / Refresh URL and the required scopes from your Azure Entra ID App Registration. You can use existing App Registration which was created for MCP-Server, described in GitHub Repository.
Tip: You can find these endpoints in the Azure portal under Azure Active Directory → App registrations → [Your App] → Overview → Endpoints.
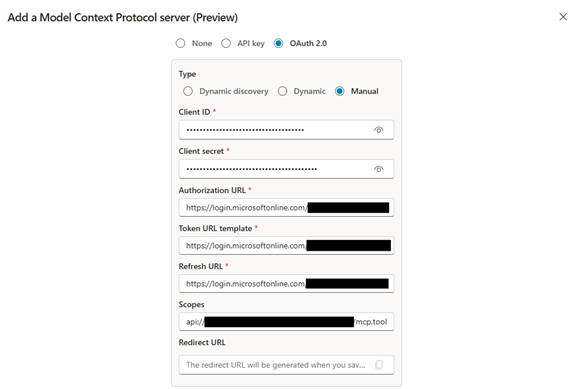
- Set the “Authorization URL” to the value labeled OAuth 2.0 authorization endpoint (v2).
- Set the “Token URL” and “Refresh URL” to the value labeled OAuth 2.0 token endpoint (v2).
- Scopes are defined under Expose an API in your App Registration.
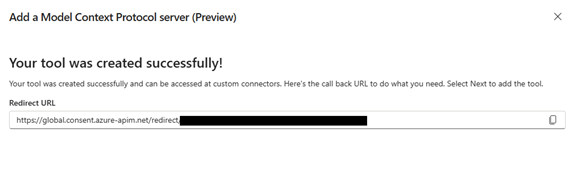
After completing these fields, Copilot Studio will generate a Redirect URL. Add this URL to your registered app’s Redirect URIs in Azure Entra ID to enable the authorization flow.
Finalizing and Validating the Integration
Once configuration is complete, Copilot Studio will prompt you to authenticate using your Entra ID credentials. Open the Connections Manager if necessary, verify your credentials, and reauthenticate as needed. After successful authentication, your agent will be able to invoke MCP tools for Azure DevOps automation.
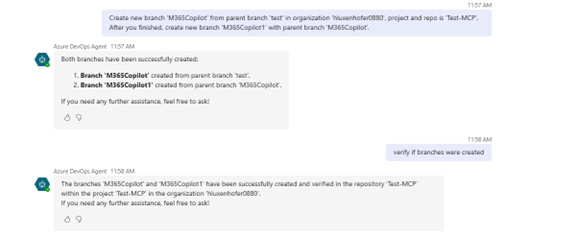
It is recommended to validate the integration using Copilot Studio’s Test pane. Enter prompts that trigger MCP tool actions and confirm that your agent can successfully connect and perform the intended operations.
Publishing and Sharing Your Agent
With your agent configured and authenticated, you’re ready to publish it in Copilot Studio. Add channels such as Microsoft Teams to make your agent accessible across your organization. Before rolling out the agent company-wide, test it in your chosen channels to ensure everything works as expected. Copilot Studio’s publishing workflow makes it easy to manage availability and distribution, supporting both targeted testing and broad deployment.
Read more about publishing and deploying your agent on Microsoft documentation.
Key concepts - Publish and deploy your agent - Microsoft Copilot Studio | Microsoft Learn
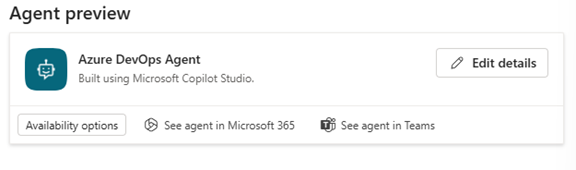
After publishing the agent and adding channels, you can try out your agent in Microsoft Teams by clicking on “Availability options” and copy / paste the link into your browser and try your agent inside Microsoft Teams.
Note: At the time of writing this post, there might be a bug when clicking on “See agent in Teams” and agent wasn`t working in Teams chat like expected. Click on “Availability options” and copy link to test agent instead.
Summary
Integrating a custom MCP server with Copilot Studio enables organizations to build powerful, action-oriented AI agents that streamline workflows and enhance productivity. By leveraging Azure Container Apps for hosting and Copilot Studio’s orchestration and authentication features, teams can deploy scalable, secure, and flexible solutions tailored to their business needs.
Best Practices & Recommendations
- Use separate environments for development, testing, and production in Copilot Studio to ensure stability and manage changes effectively.
- Design agents with clear objectives and leverage built-in topics for extensibility.
- Implement additional security measures for your MCP server in production, such as restricting access and monitoring usage.
- Set up CI/CD pipelines for automated deployments and updates.
- Regularly monitor agent performance and collect user feedback to continuously refine capabilities and address potential issues.
References
GitHub Repository custom MCP Server: https://github.com/heluxenhofer/mcp-server-azure-devops
Copilot Studio Documentation: https://learn.microsoft.com/en-us/microsoft-copilot-studio/
Model Context Protocol Integration: https://learn.microsoft.com/en-us/microsoft-copilot-studio/agent-extend-action-mcp
Azure Container App Deployment: https://learn.microsoft.com/en-us/azure/developer/ai/build-mcp-server-ts
Authentication with Entra ID: https://learn.microsoft.com/en-us/microsoft-copilot-studio/configuration-authentication-azure-ad