Create CIFAR-10 Deep Learning Model with ANNdotNET GUI Tool
With ANNdotNET 1.2 the user is able to create and train deep learning models for image classification. Image classification module provides minimum of GUI actions in order to fully prepare data set. In this post, we are going to create and train deep learning model for CIFAR-10 data set, and see how it easy to do that with ANNdotNET v1.2.
In order to prepare data we have to download CIFAR-10 data set from official web site . The CIFAR-10 data set is provided in 6 binary batch files that should be extracted and persisted on your local machine. Number 10 in the name means that data set is created for 10 labels.The following image shows 10 labels of CIFAR-10 data set each label with few sample images.
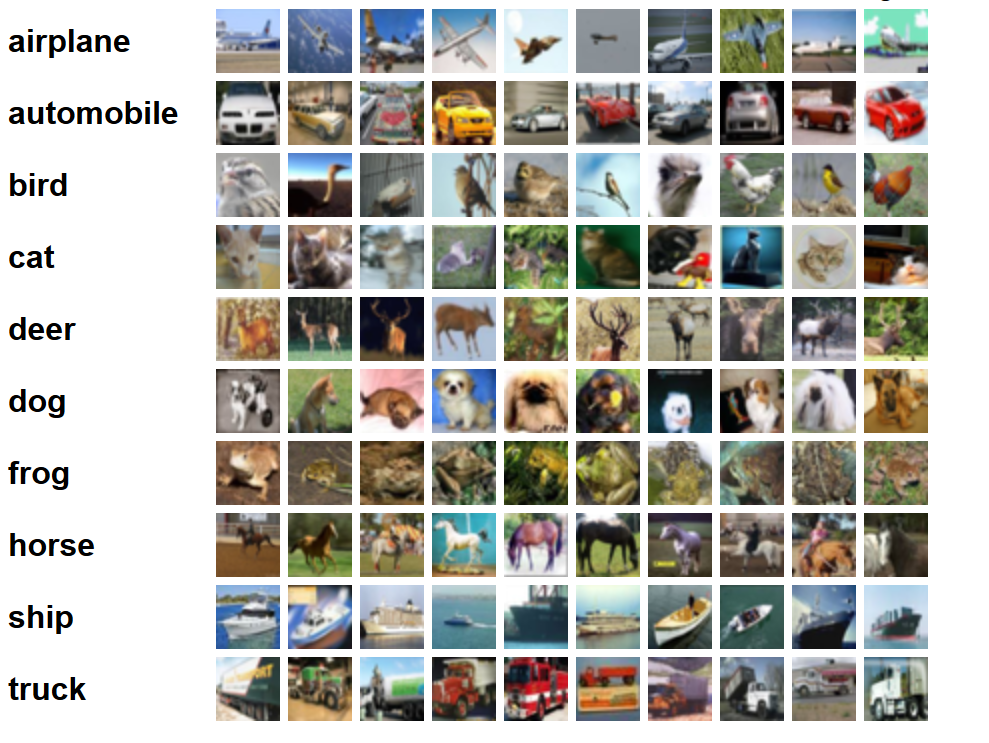
The data set contains 60 000 (50 000 for training and validation, and 10 000 for test) tinny colored images dimensions of 32x32. There is also bigger version of the data set CIFAR-100 with 100 labels. Our task is to create deep learning model capable of recognizing only one of 10 predefined labels from each image.
Data preparation
In order to prepare images, we need to do the following:
- download compressed file (http://www.cs.toronto.edu/~kriz/cifar-10-binary.tar.gz)
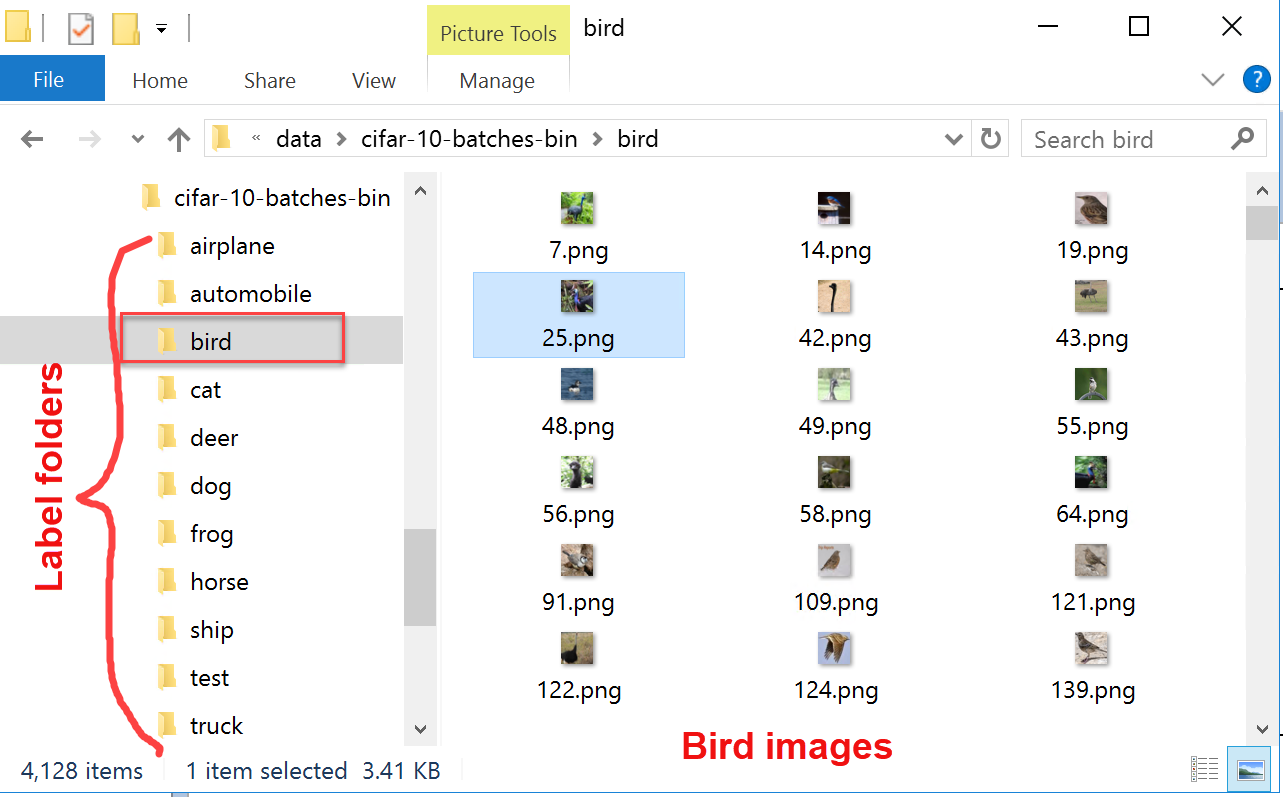
- decompress the file and store each image in 10 different folders that are represent image label.
- each folder contains images for one label.
The following image shows extracted data set persisted in 10 label folders. The bird folder is opened and shows all images labeled for bird. The test folder contains all images created for testing the model once the model is trained.
In order to properly save all images, we need to create simple C# Console application which should extract and save all 60 000 images. Complete C# program can be downloaded from here.
In order to successfully extract the images, we have to see how those images are stored in binary files. From the official site we can see that there are 5 for training and 1 for test binary files: data_batch_1.bin, data_batch_2.bin, …, data_batch_5.bin, as well as test_batch.bin. Each of these files is formatted as follows so that the first byte of the array is label index, and the next 3072 represent the image. Each batch contains 10000 images.
Important to know is that images are stored in CHW format which means that 1d image array is created so that the first 1024 bytes are the red channel values, the next 1024 the green, and the final 1024 the blue. The values are stored in row-major order, so the first 32 bytes are the red channel values of the first row of the image. So all those information have been carried out when implementing the Extractor application. The most important methods are reshaping the 1D byte array into [3, height, width] image tensor, and creating the image from the byte tensor. The following implementation shows how 1D byte array transformed into 3channel bitmap tensor.
static int[][][] reshape(int channel, int height, int width,  byte[] img)
{
    var data = new int[channel][][];
    int counter = 0;
    for(int c = 0; c < channel; c++)
    {
        data[c] = new int[height][];
        for (int y = 0; y < height; y++)
        {
            data[c][y] = new int[width];
            for (int x = 0; x < width; x++)
            {
                data[c][y][x] = img[counter];
                counter++;
            }
        }
    }
    return data;
}
Once the 1D byte array is transformed into tensor, the image can be created and persisted on disk. The following method iterates through all 10000 images in one batch extract them and persist on disk.
public static void extractandSave(byte[] batch, string destImgFolder, ref int imgCounter)
{
    var nStep = 3073;//1 for label and 3072 for image
    //
    for (int i = 0; i < batch.Length; i += nStep)
    {
        var l = (int)batch[i];
        var img = new ArraySegment<byte>(batch, i + 1, nStep - 1).ToArray();
// data in CIFAR-10 dataset is in CHW format, which means CHW: RR...R, GG..G, BB..B;

        // while HWC: RGB, RGB, ... RGB
        var reshaped = reshape(3, 32, 32, img);
        var image = ArrayToImg(reshaped);
        //check if folder exist
        var currentFolder = destImgFolder + classNames[l];

        if (!Directory.Exists(currentFolder))
            Directory.CreateDirectory(currentFolder);

        //save image to specified folder
        image.Save(currentFolder + "\\" + imgCounter.ToString() + ".png");

        imgCounter++;
   }
}
Now that we have 60000 tiny images on disk arranged by label we can start creating deep learning model.
Create new Image Classification annproject file in ANNdotNET
Open the latest ANNdotNET v1.1 and select New-> Image Classification project. Enter CIFAR project name and press save button. The following image shows CIFAR new ann-project:

Once we have new project, we can start defining image labels by pressing Add button. For each 10 labels we need to add new label item in the list. In each item the following fields should be defined:
- Image label
- Path to images with the label.
- Query - in case we need to get all images within the specified path with certain part of the name. In case all images withing the specified path are images that indicate one label, query should be empty string.
Beside Label item, image transformation should be defined in order to define the size of the images, as well as how many images create validation/test data set.
Assuming the CIFAR-10 data set is extracted at c:/data folder, the following image shows how label items should be defined:

In case label item should be removed from the list, this is done by selecting the item, and then pressing Remove button. Beside image properties, we should defined how many images belong to validation data set. As can be seen 20% of all extracted images will be created validation data set. Notice that images from the test folder are not part of those two data set. they will be used for testing phase once the model is trained. Now that we done with data preparation we can move to the next step: creating mlconifg file.
Create mlconfig in ANNdotNET
By selecting New MLConfig command the new mlconfig file is created within the project explorer. Moreover by pressing F2 key on selected mlconfig tree item, we can easily change the name into "CIRAF-10-ConvNet". The reason why we gave such name is because we are going to use convolution neural network in order to build model.
In order to define mlconfig file we need to define the following:
- Network configuration using Visual Network Designer
- Define Learning parameters
- Define training parameters
Create Network configuration
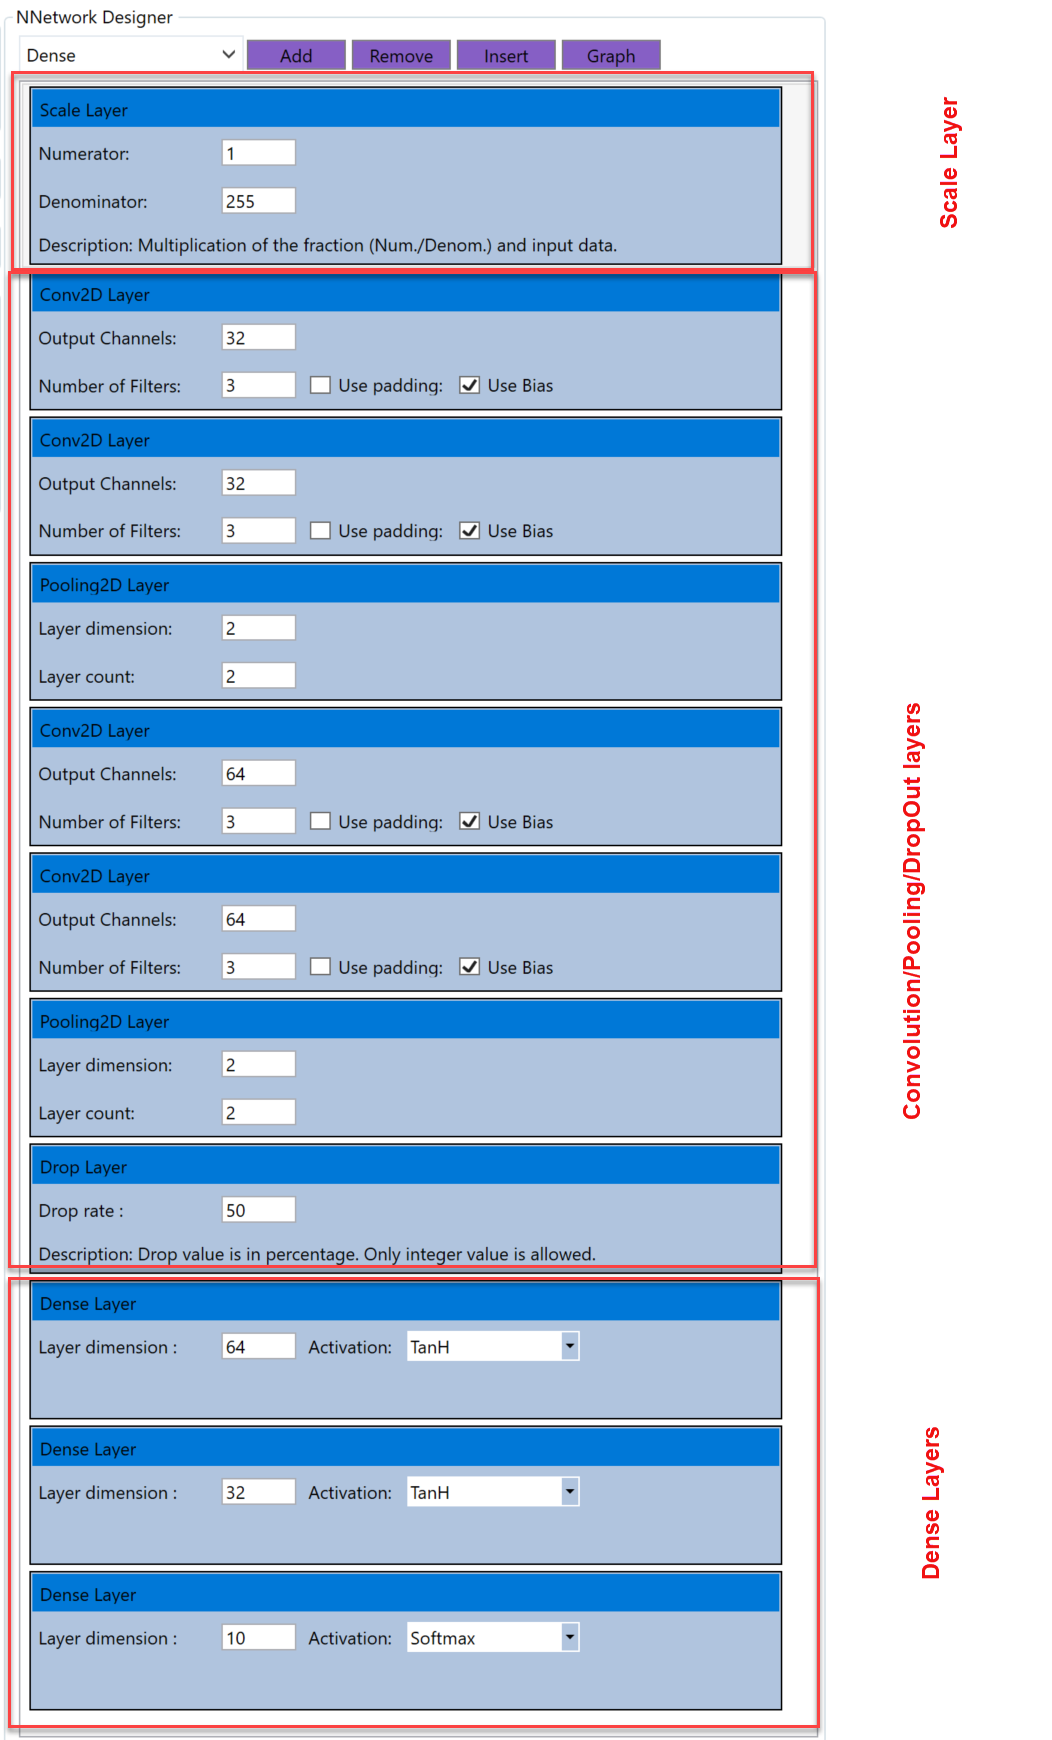
By using Visual Network Designer we can quickly create network model. For this CIFAR-10 dataset we are going to create 9 layers model with two Convolutional, 2 Pooling, 2 DropOut and 2 Dense layer, all followed by Scale layer:
Scale (1/255)->Conv2D(32,[3,3])->Pooling2d([2,2],2)->DropOut(0.2)->Conv2D(64,[3,3])->Pooling2d([2,2],2)->DropOut(0.2)->Dense(512, ReLU)->Dense(10,Softmax)
This network can be created so that selecting appropriate layer from the VND combo box and clicking on the Add button. The first layer is Scale layer, since we need to normalize input values to be in interval (0,1). Then we created two sequence of Convolution, Pooling and Drop out layers. Once we done with that, we can add one Dense layer with 512 neurons and ReLU activation function. The last layer is output layer that must follow the output dimension, and Softmax activation function.
Once network model is defined, we can move to the next step: Setting learning and training parameters.
Learning parameters can be defined through the Learning parameters interface: For this model we can select:
- AdamLearner with 0.005 rate and 0.9 momentum value. Loss function is Classification Error, and the evaluation function is Classification Accuracy

In order to define the training parameters we switch to Training tabe page and setup:
- Number of epoch
- Minibatch size
- Progress frequency
- Randomize minibatch during training

Now we have enough information to start training model. The training process is started by selecting Run command from the application ribbon. In order to get good model we need to train the model at least few thousands epoch. The following image shows trained model with training history charts.

The model is trained with exactly of 1144 epoch, with network parameters mentioned above. As can be seen from the upper chart, minibatch loss function was CrossEntropyWithSoftmax, while the evaluation was classification accuracy. The bottom chart shows performance of the training and validation data sets for each 1144 epoch. We can also recognize that validation data set has roughly the same accuracy as training data set which indicates the model is trained well. More details about model performance can be seen on the next image:

Upper charts of the image above show actual and predicted values for training (left) and validation (right). Most of the point values are blue and overlap the orange which indicates that most of value are correctly predicted. The charts can be zoomed and view details of each value.The bottom part of the evaluation show performance parameters of the model for corresponded data set. As can be seen the trained model has 0.989 accuracy for training data set and 0.986 accuracy for validation data set, which indicate high accuracy of the model. Moreover the next two images shows confusion matrix for the both data set, which in details shows how model predict all 10 labels.


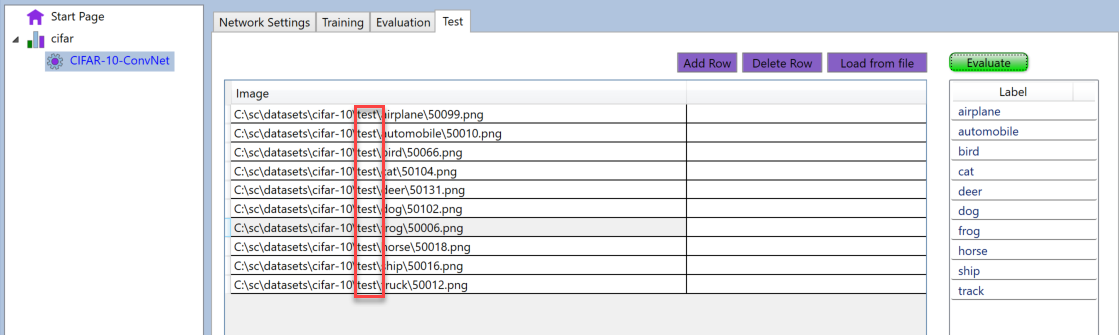
The last part of the post is testing model for test data set. For that purpose we selected 10 random images from each label of the test set, and evaluate the model. The following images shows the model correctly predicted all 10 images.
Conclusion
ANNdotNET v1.2 image classification module offers complete data preparation and model development for image classification. The user can prepare data for training, create network model with Neural Network Designer, and perform set of statistical tools against trained model in order to validate and evaluate model. The important note is that the data set of images must be stored on specific location in order to use this trained model shown in the blog post. The trained model, as well as mlcofig files, can be load directly into ANNdotNET project explorer by doublick on CIFAR-10.zip feed example.
