To configure 2-way certificate authentication in the MQSC adapter used in BizTalk receive location to retrieve messages from an IBM MQ Queue you’ll need at least 2 certificate sets:
1. Server Certificates set
The server certificates set will be usually provided by the remote party responsible for the IBM MQ Server. This certificates set consists at least of one Server/Client authentication certificate and possible one or more Root CA certificates (if not included in the Server/Client certificate) used to build valid certification path for the Server/Client certificate.
This certificate set must be installed in two different locations on the BizTalk server to make the BizTalk MQSC Adapter able to use it:
1. Installation of Server certificates in IBM Key Database
a) Use the “IBM Key Management” Tool strmqikm.exe (can be found in the IBM MQ Client installation folder (for usually here C:\Program Files\IBM\WebSphere MQ\bin64) to create a new IBM key database as described here.
b) Use “Add…” button under “Signer Certificates” in the “IBM Key Management” GUI to add all Server certificates to the IBM key database:
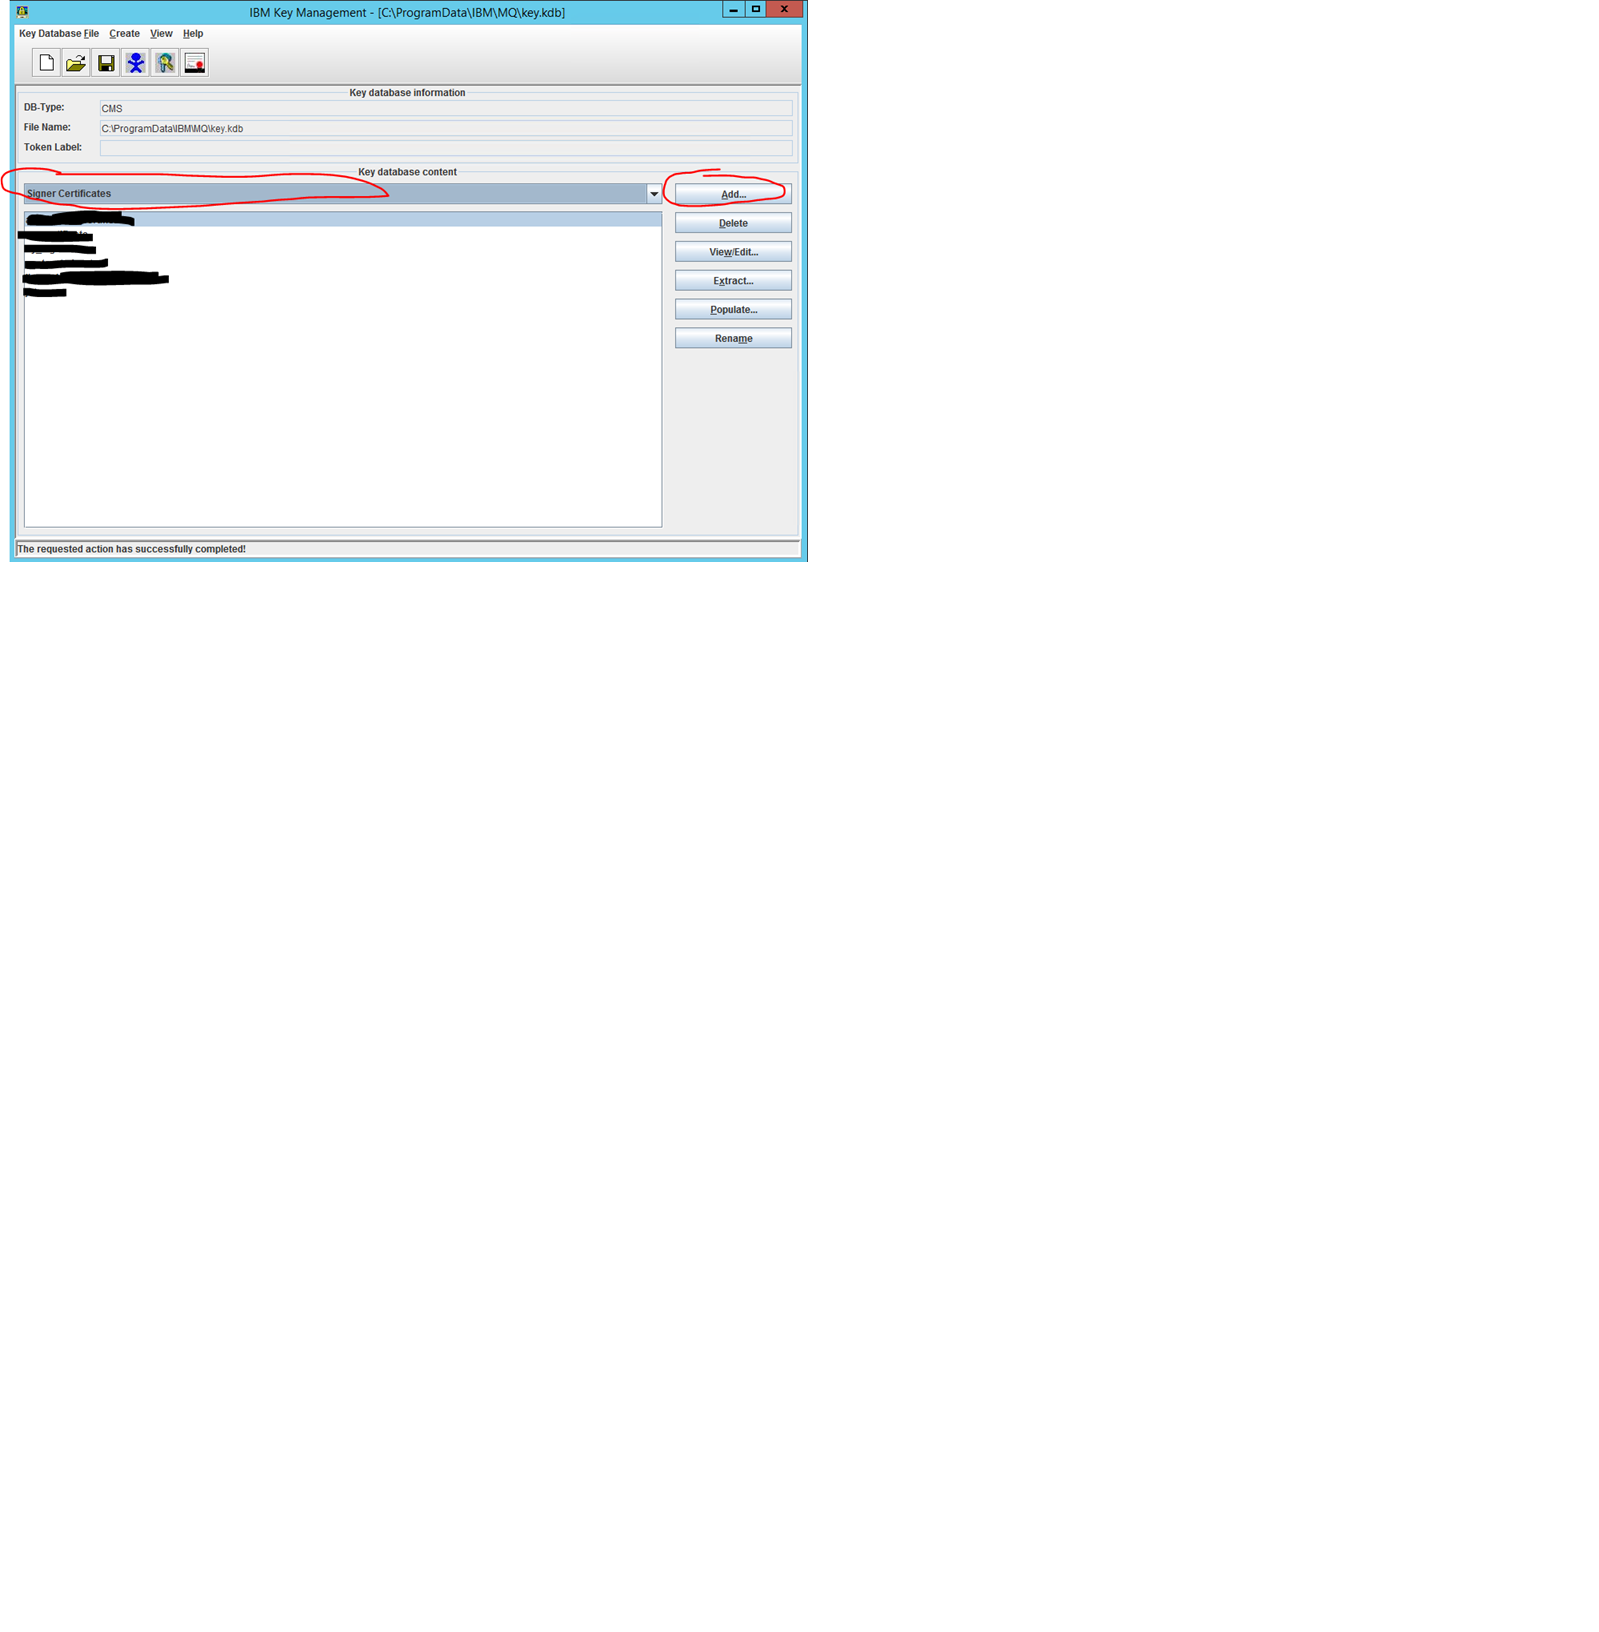
Please note, here you can use any name when asked to enter certificates label.
2. Installation of Server certificates in Windows User Certificate store
In addition to the installation of the Server certificates in the IBM Key database certificate storage, you’ll need to install the same certificates in the windows User Certificate storage on the BizTalk server. To accomplish this, you’ll need to login to the BizTalk server with the service account used by BizTalk Host Instance the MQSC adapter based Receive Location is assigned to.
a) Login to the BizTalk Server with the credentials of the service account used by BizTalk host instance assigned to the MQSC Adapter based receive location you want to get running.
b) Open User certificates storage from command prompt by using the command certmgr.msc
c) Use the “Import…” option to import all Server certificates. The Server/Client authentication certificate should be imported to the “Personal” storage. All other Root CA certificates are to be imported to the “Trusted Root Certification Authorities” storage:

2. Client Certificates set
The Client certificates set will be usually provided by the party responsible for the network/domain where the BizTalk Server is hosted. Similar to the Server certificate set, the Client certificate set also consists at least of one Server/Client authentication certificate and possible one or more Root CA certificates (if not included in the Server/Client certificate) used to build valid certification path for the Server/Client certificate. The subject of this certificate should be FQDN of the BizTalk Server.
1. Create Certificate Signing Request
Use the menu option “Create -> New Certificate Request …” in the “IBM Key Management” tool (installed with the IBM MQ Client installation under C:\Program Files\IBM\WebSphere MQ\bin64\strmqikm.exe) on the BizTalk Server to generate Certificate Signing Request (CSR) for the BizTalk Server machine:
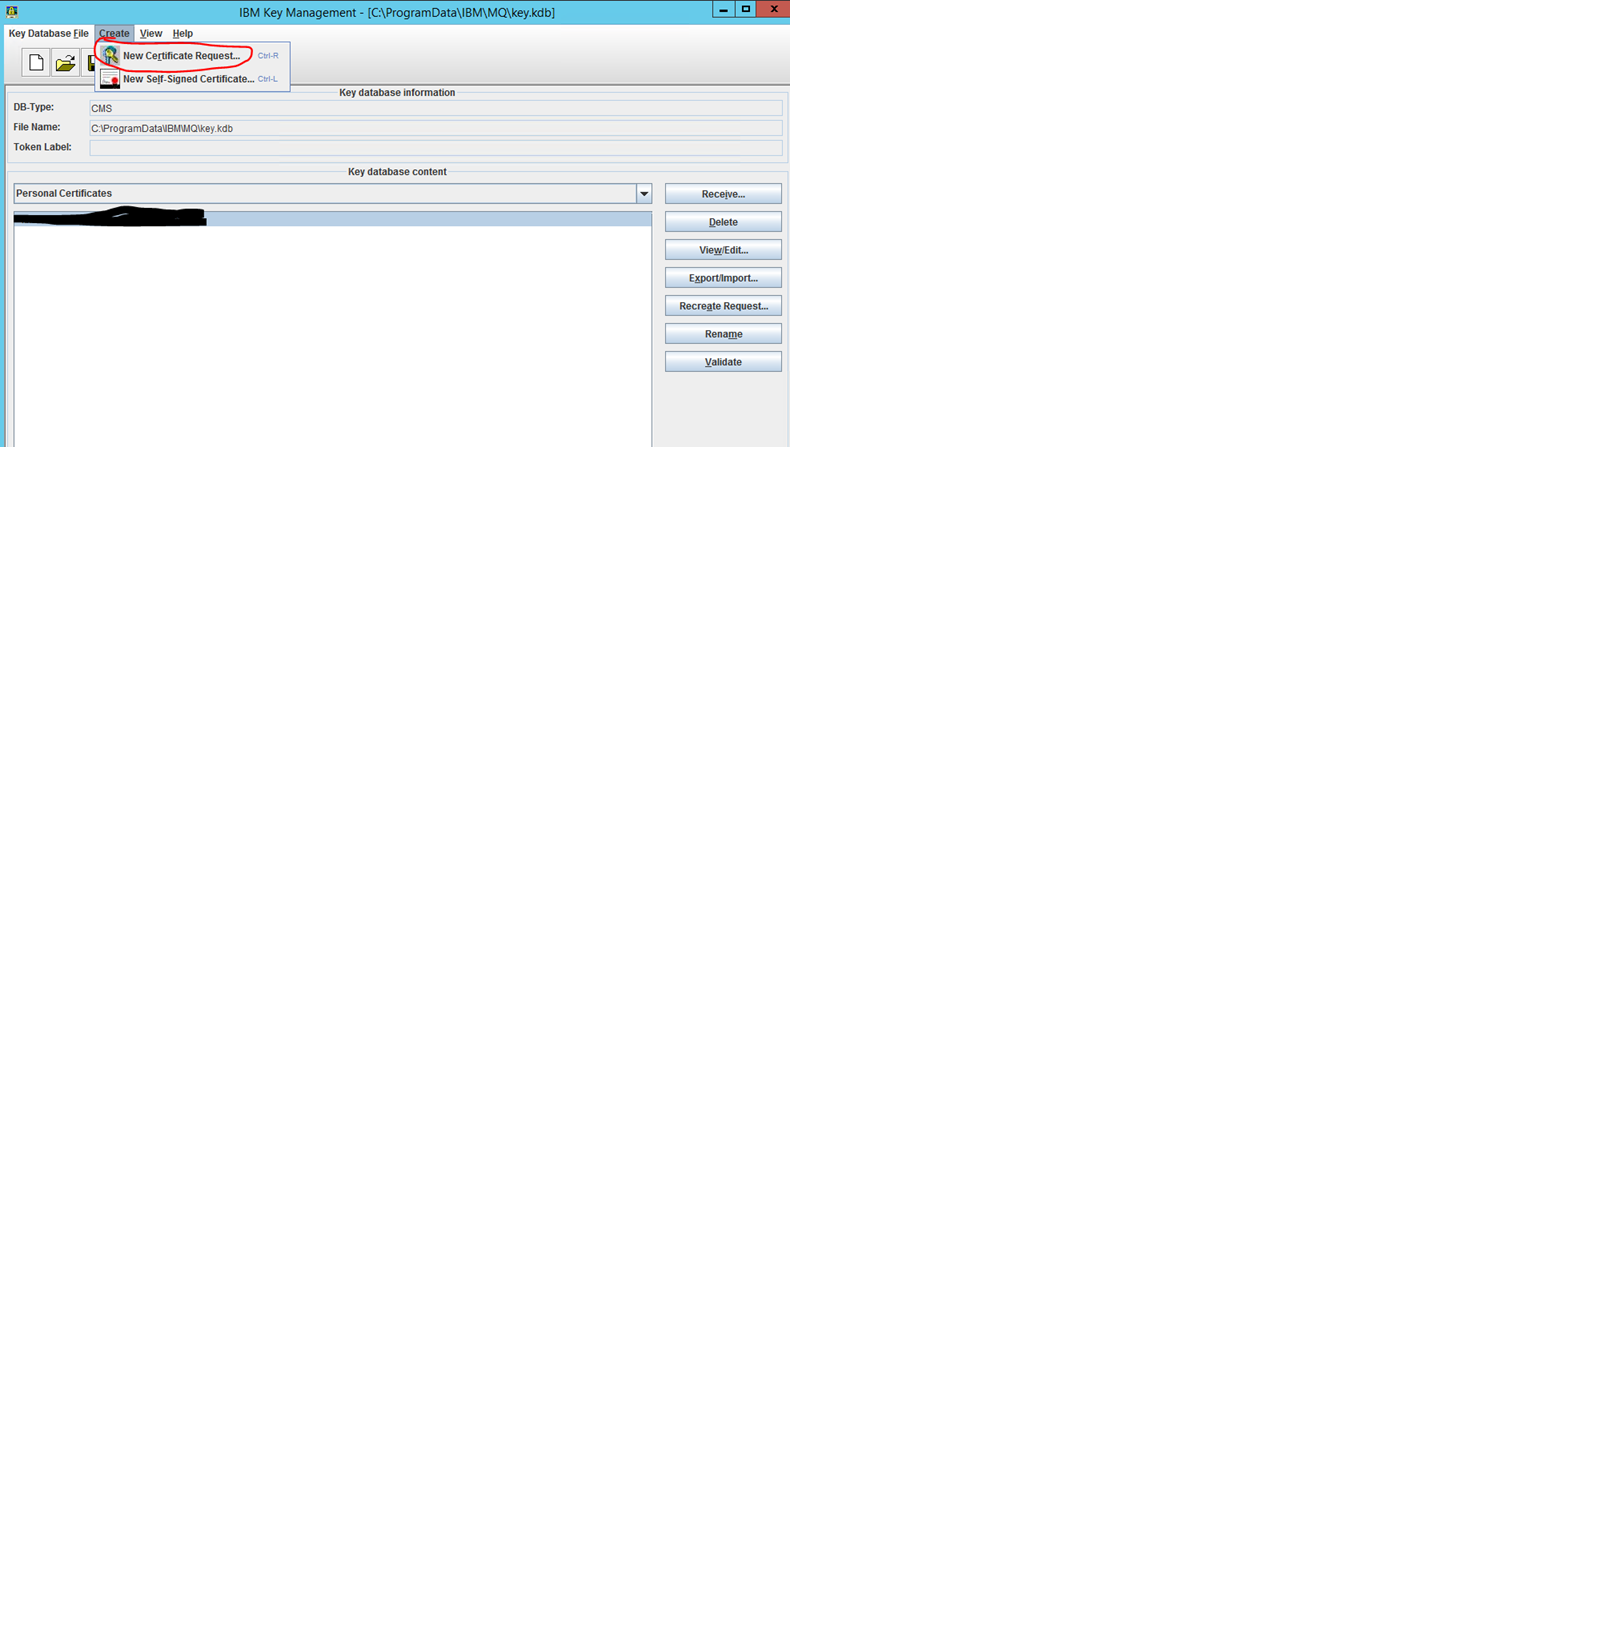
In the field “Key Label” you can use any name to describe the certificate. The Certificate Request will appear under this label in the list of certificate requests in the IBM Key Management tool.
I have used “Key Size” 1024 and “Signature algorithm” SHA384WithRSA. Important is to set “Common Name” to FQDN name of the BizTalk Server (if not automatically filled).
You should also fill out further fields like organization, country etc. to make the certificate more transparent later.
2. Send CSR file to system admin
Provide the generated CSR file to the system administrator of the BizTalk Server domain to get valid Client certificates set.
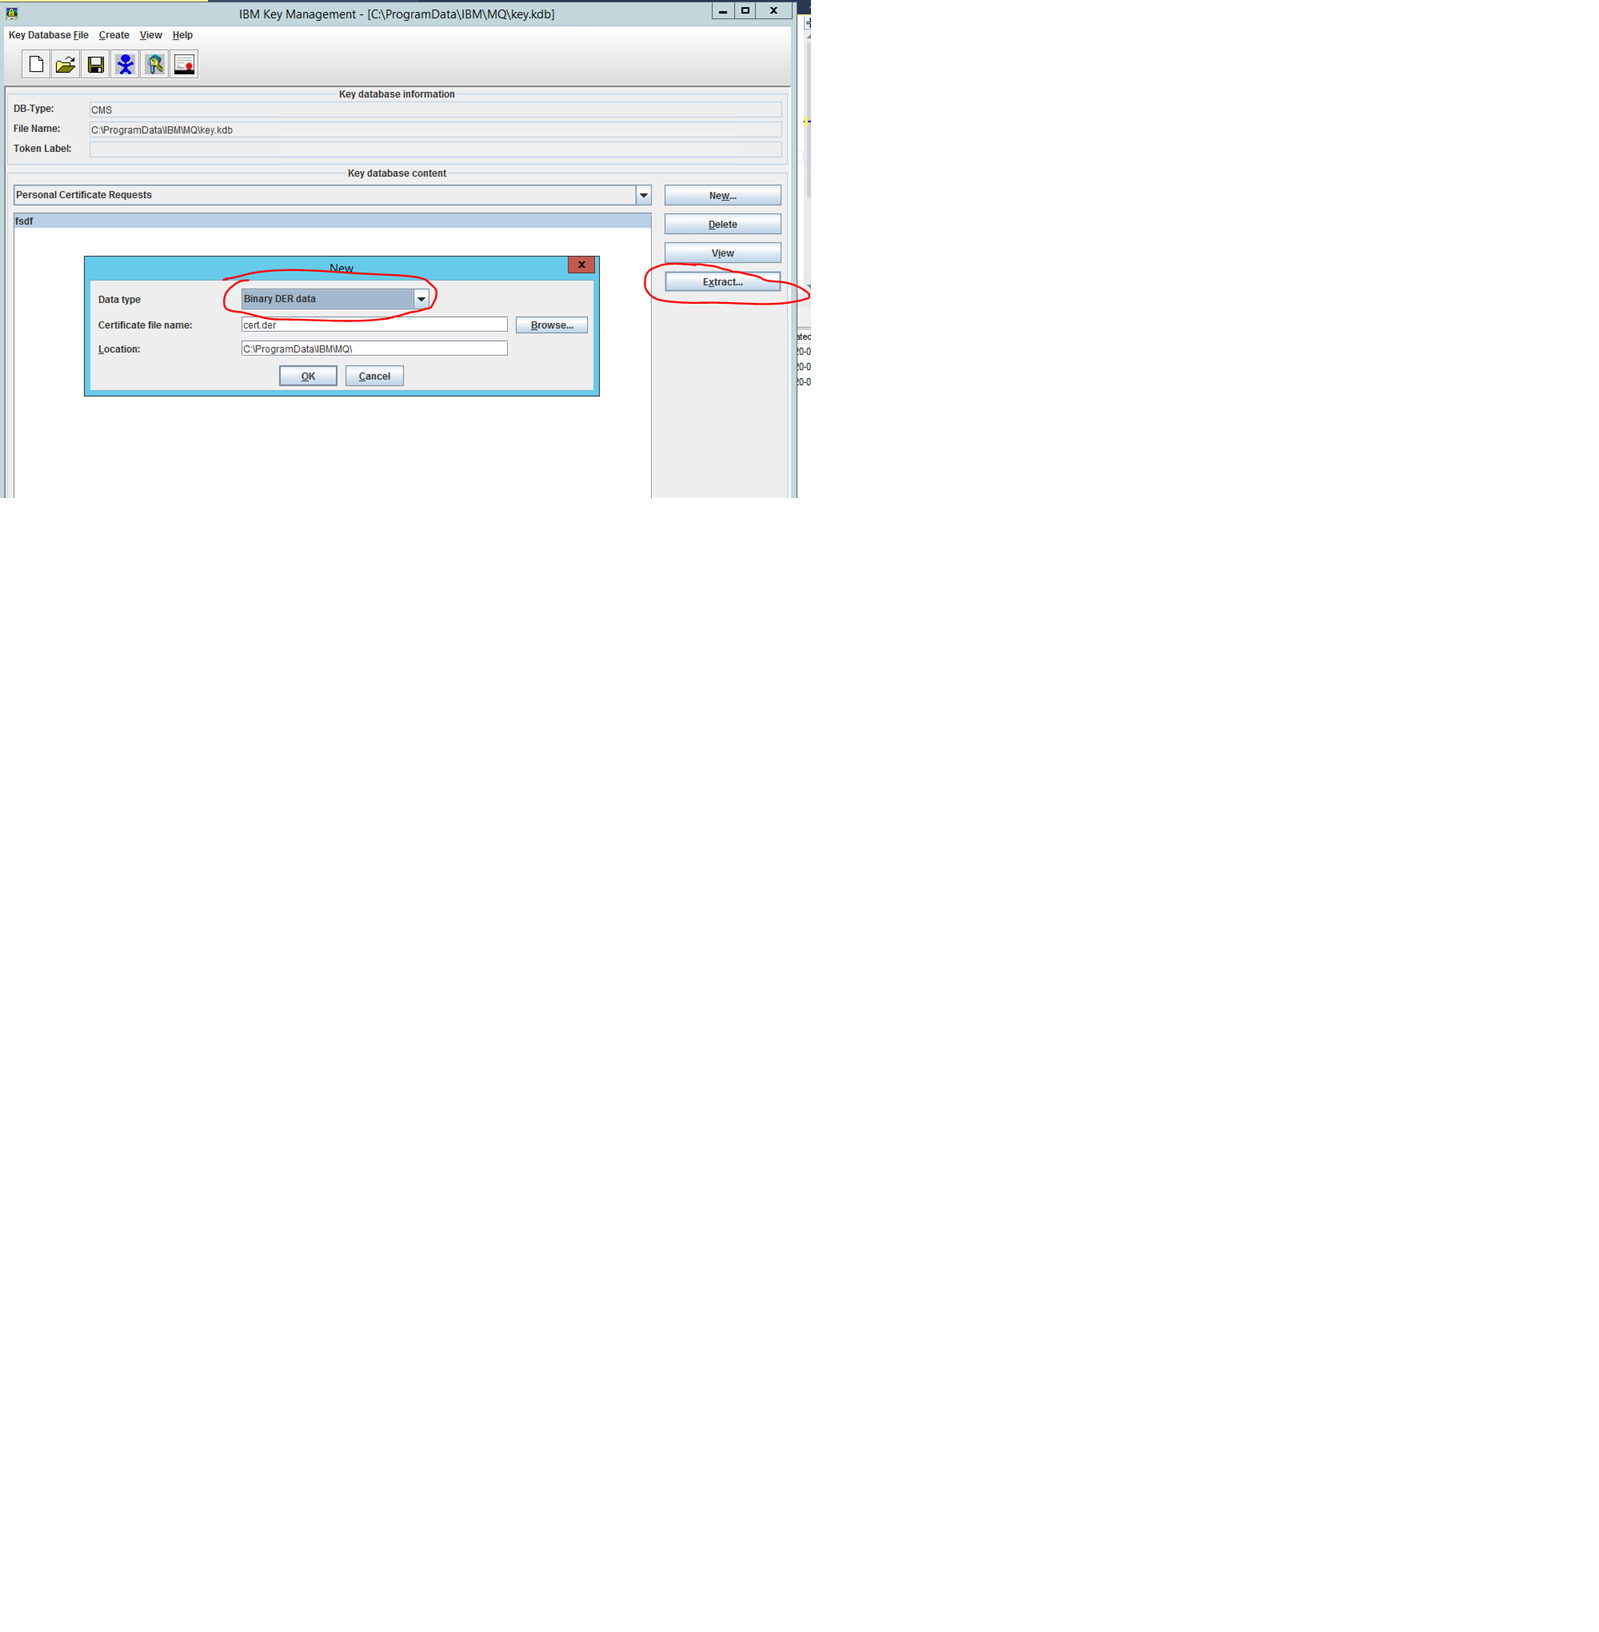
Please note, the IBM Key Management tool creates CSR file in *.arm format which is not supported by Windows tools for certificate generation. If your system administrator requires *.der format you can use the function “Extract …” to create CSR export in this format:
For more details regarding how to send third party certificate signing request on windows see the following links:
https://www.ibm.com/support/pages/request-contains-no-certificate-template-information-when-signing-thirdpartycertificatetool-csr
https://docs.microsoft.com/en-us/windows-server/administration/windows-commands/certreq_1
The certificate template to be used is by system administrator is “Computer”, “Client Authentication, Server Authentication”:

3. Import Certificate retreived from system admin
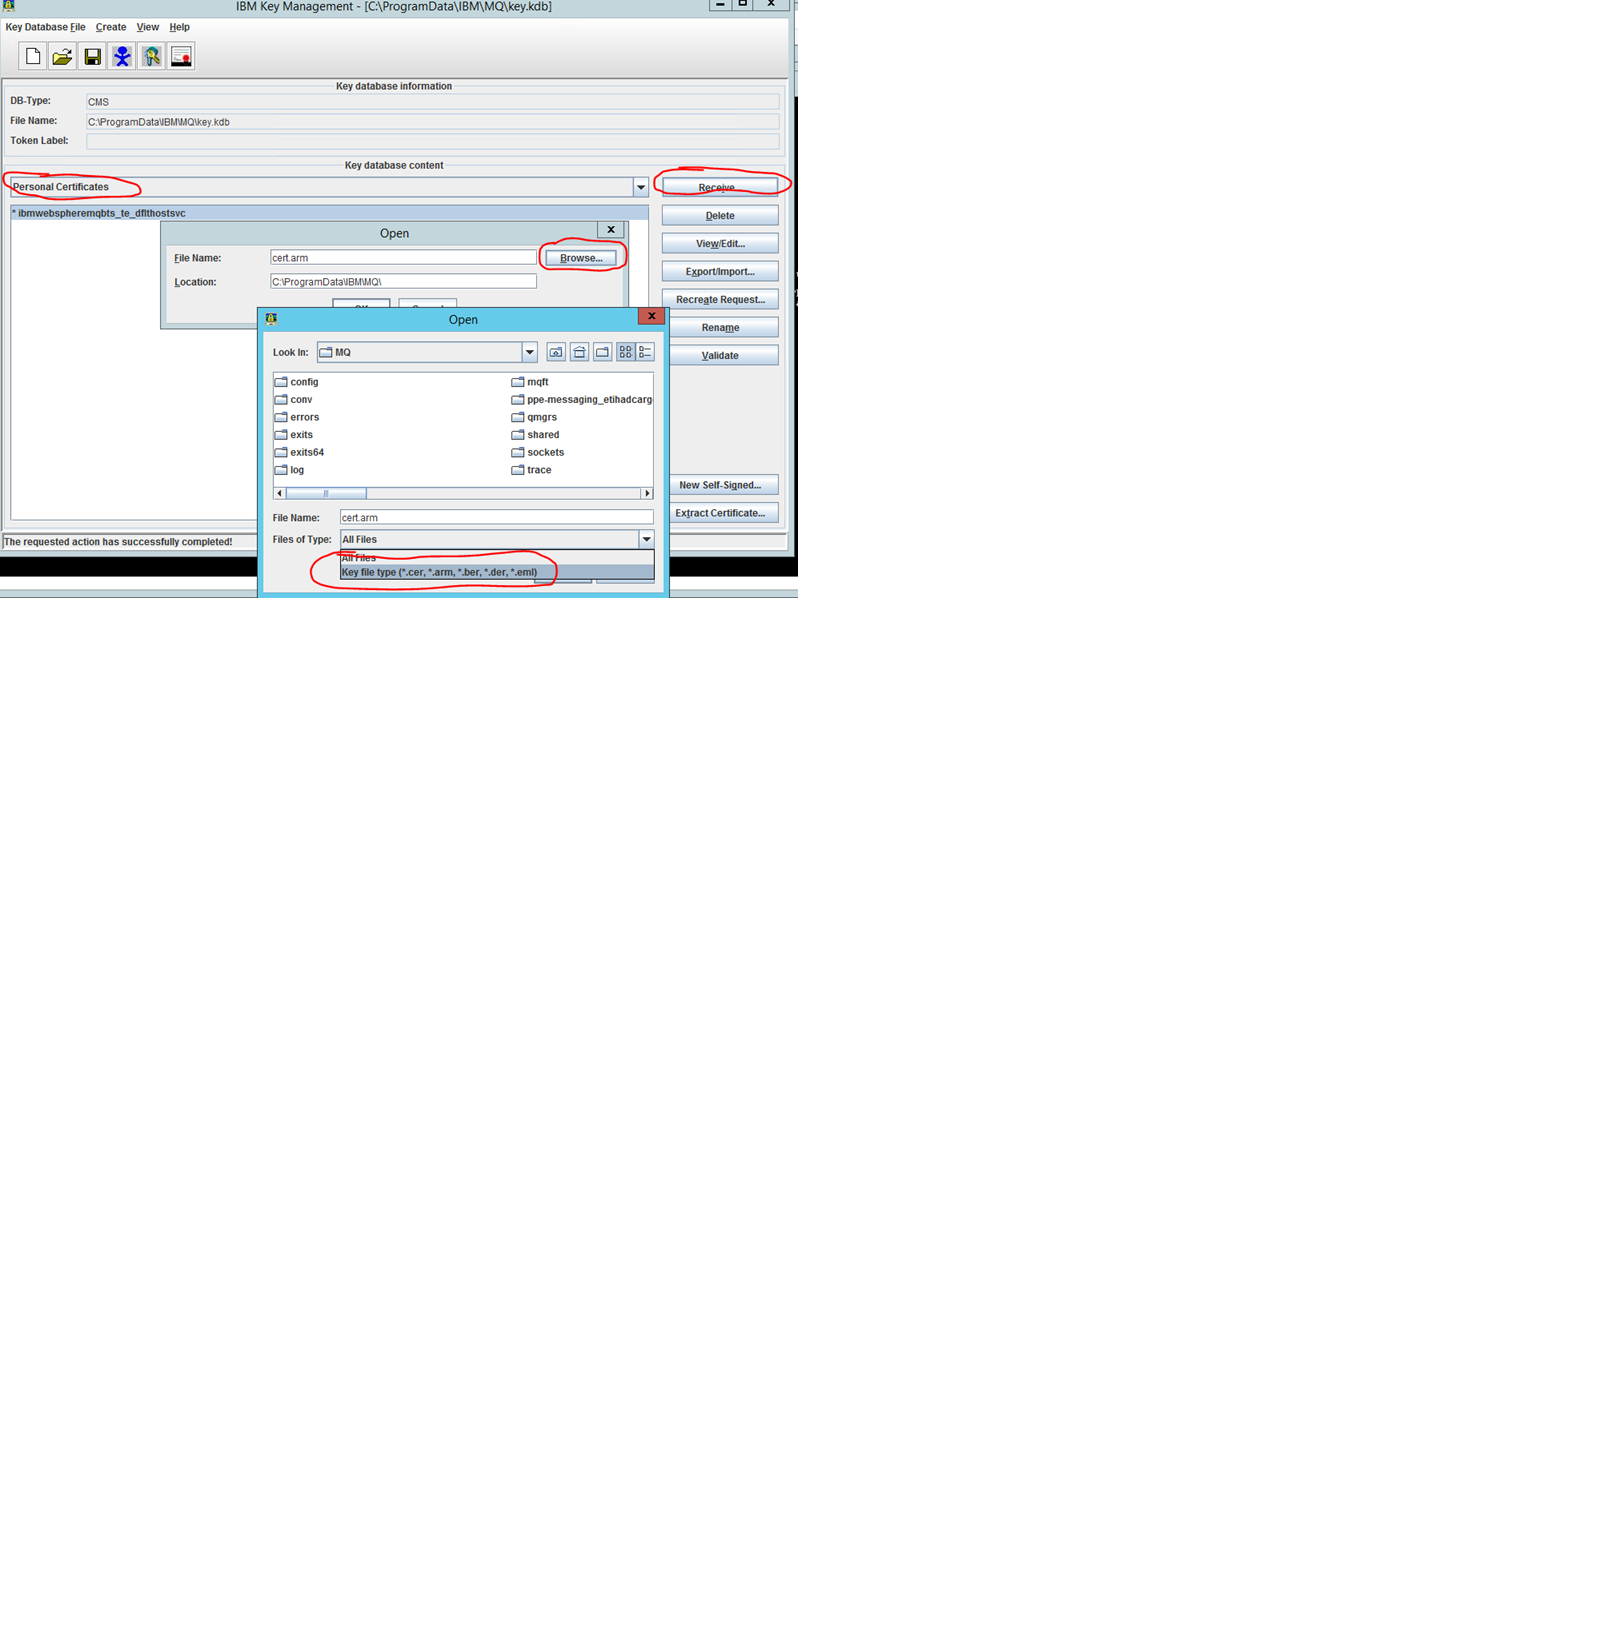
Once the system administrator has provided the Client certificate set to you, you’ll need to use the action “Receive …” under “Personal Certificates” in the “IBM Key Management” GUI to import the certificate retrieved from the system administrator:
4. Import Root CA certificates too (onl if the imported certificate is not valid)
If the certificate doesn’t contain all Root CA certificates building the full certification path (you can check this by using “Validate” action under “Personal Certificates”), you’ll need to import CA Root certificates manually by using “Add …” action under “Signer Certificates” in the “IBM Key Management” GUI.
IMPORTANT: The label of the Client Certificate must be built from the fix prefix “ibmwebspheremq” followed by the name of the service account the BizTalk Host Instance is running with in lowercase. I.e. “ibmwebspheremqbtssvcaccount” without quotes, when the name of the account used by BizTalk Host instance is “BtsSvcAccount”.
5. Provide public part of certificate to the remote party
Finally, extract the public key and provide it to the remote party to make them able to prepare the IBM MQ Server for the communication with the BizTalk server.
For more details how to extract certificate public key see here.
4. Configure BizTalk MQSCA Adapter for Receive Location
Finally you can configure the BizTalk MQSC Adapter in the Receive Location.
The minimal set of the mandatory settings required for MQSC Adapter configuration even if you don’t want to configure two-way certificate based authentication are:
• Connection name (IP address or host name of the IBM MQ Server)
• Port number of the IBM MQ
• Channel name
• Name of the Queue Manager
• Name of the Queue
All those values provided to you by the remote party which is hosting the IBM MQ Server, must be entered in the MQSC Adapter settings view.
In addition to those parameters remote party must provide to you a value for the Adapter setting “SSL Cipher Specification” (i.e. something like ECDHE_RSA_AES_256_CBC_SHA384) which is also to be configured in the BizTalk MQSC adapter settings of the receive location.
The last required setting is “SSL Key Repository Location” which is actually path of the IBM Key database created in the step 1.1.a of this description.
Please note, the name of the IBM Key database file must not contain file extension (i.e. if the Key DB name is C:\ProgramData\IBM\MQ\key.kdb the value to enter in the “SSL Key Repository Location” is “C:\ProgramData\IBM\MQ\key”.
I used BizTalk Server 2013 R2, but the is probably valid for other BizTalk versions too.
Update:
While trying to get the MQSC adapter based Receive Location in the production environment running, we detected some more issues and additional configuration steps were required.
- On the MQ Server side the admins needed to add following setting:
CHANNELS:
PasswordProtection=OPTIONAL - In the MQSC BizTalk adapter settings we entered the value "mqm" as "User Id".
- On the BizTalk server, in the file mqclient.ini (C:\Program Files (x86)\IBM\WebSphere MQ\mqclient.ini) we added folloowing configuration:
SSL:
OCSPAuthentication=OPTIONAL
OCSPCheckExtensions=NO
CDPCheckExtensions=NO
CHANNELS:
PasswordProtection=OPTIONAL
MQCSP.AuthenticationType=MQCSP_AUTH_NONE - We added following environment variable to the BizTalk machine:
MQCCSID = 1208
Please remark, all those changes were not required in all environments we have.