If you are enterprise developer, you are probably excited with many, many nice and powerful features. But sometimes you might be disappointed, because tablets and related devices have not hardware and software power of common Windows operative system.
On of such missing things sounds to be authentication. If you refer documentation you will mot not find much about NTLM and KERBEROS in the world of Windows RT.
But it is not that bad as it looks. It is more documentation issue than technology gap.
Here we go.
We introduce in this scenario (in context of this article) WebApi REST service hosted in IIS. You do not want to use any of social providers like Facebook, Twitter, Google & Co.
But no problem. Before you begin, enable Windows Authentication. When you do that IIS Manager will enable Kerberos and NTLM. By selecting of different providers you can dedicate which authentication mechanism will be used.
Then use following code to authenticate by using WebApi REST HttpClient API:
var handler = new HttpClientHandler();
handler.AllowAutoRedirect = true;
handler.Credentials = CredentialCache.DefaultCredentials;
var httpClient = new HttpClient(handler);
HttpResponseMessage response = await httpClient.GetAsync("http://…");
After you execute this code everything following exception will be thrown:
{"The remote server returned an error: (401) Unauthorized."}

You might be surprised, because of this, because you will expect the client to authenticate successfully. The problem is that the app does not send the required token at all.
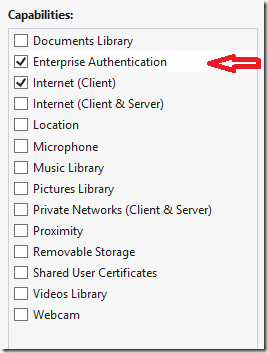
To make this working open Package.appxmanifest and set capability “Enterprise Authentication”.

This will force the app to attach credentials to Authorization header of HTTP request. Following two samples show both Kerberos and NTLM in action:
Authorization header in case of KERBEROS:
Negotiate oXcwdaADCgEBoloEWE5UTE1TU1AAAwAAAAAAAABYAAAAAAAAAFgAAAAAAAAAWAAAAAAAAABYAAAAAAAAAFgAAAAAAAAAWAAAABXCiOIGAvAjAAAADxhfFCC6k8mdD2iUYtXyj3ujEgQQAQAAAPUXp1AtIpqEAAAAAA==
Authorization header in case of NTLM:
NTLM TlRMTVNTUAADAAAAAAAAAFgAAAAAAAAAWAAAAAAAAABYAAAAAAAAAFgAAAAAAAAAWAAAAAAAAABYAAAABcKIogYC8CMAAAAPSVODw6Arubt+pEbBIm0Mxw==
Last but not least, it is interesting to know how a dedicated user can be authenticated.
Following code snippet shows how to authenticate user with name ‘username’:
var credential = new NetworkCredential("username", "***","DOMAIN");
var myCache = new CredentialCache();
myCache.Add(new Uri("http://prefix of the service uri/"), "NTLM", credential);
handler.Credentials = myCache;
var httpClient = new HttpClient(handler);
HttpResponseMessage response = await httpClient.GetAsync("http://…");
Posted
Jun 20 2013, 07:44 PM
by
Damir Dobric