This year on Azure on Tour in Frankfurt we organized an IoTLab for all interested attendees. We scheduled 3slots of 2 hours.
Unfortunately they all ware booked out in very short time.
We prepared for this IoT lab a weather station on Arduino as described here. If you follow provided link step by step, you will most likely be able to build your own weather station based on sparkfun electronics red board (19$) and weather shield (39$).
The station will send telemetry data from station to Azure IoT hub. I tried to do all programming by using Arduino IDE and Visual Studio code. They all are kind of cool, but I’m Visual Studio guy. So I downloaded Node.js tools for Visual Studio. Here is also an interesting video, which describes how to use tools.

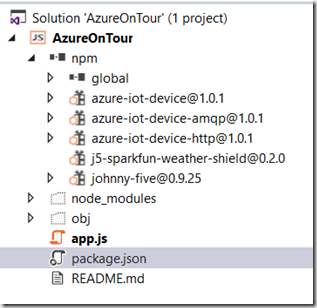
Once you have install tools, you can create new weather station project from Node.js project template shown below:
This will create all required artifacts as VS does it in every project type. As next, open project.json file and paste the project content as described here.

Content of your project.json file should look like shown in the snipped bellow. Please note that you change main entry file from weather.js as described in LAB guide to app.js, because VS creates main file in app.js. Right now you can leave it as it is, but it is not correct.
| {
"name": "IoT-Labs-Arduino",
"repository": {
"type": "git",
"url": "https://github.com/ThingLabsIo/IoTLabs/tree/master/Arduino/Weather"
},
"version": "0.1.0",
"private": true,
"description": "Sample app that connects a device to Azure using Node.js",
"main": "app.js",
"author": "Damir Dobric",
"license": "MIT",
"dependencies": {
"azure-iot-device": "latest",
"azure-iot-device-amqp": "latest",
"azure-iot-device-http": "latest",
"johnny-five": "latest",
"j5-sparkfun-weather-shield": "latest"
}
} |
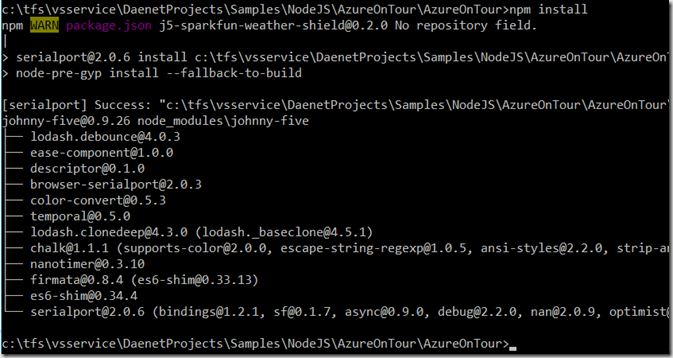
After you did this step, open the “develop command prompt for vs 2015” console and execute following statement in the folder where
project.json is located:
>npm install
As result you will see something like this:

Now, we need to implement the code in app.js, which collects events and sent them Azure IoT Hub. Following snippet shows all required code:
| // https://github.com/ThingLabsIo/IoTLabs/tree/master/Arduino/Weather
'use strict';
// Define the objects you will be working with
var five = require("johnny-five");
var Shield = require("j5-sparkfun-weather-shield")(five);
var device = require('azure-iot-device');
// Use factory function from AMQP-specific package
// Other options include HTTP (azure-iot-device-http) and MQTT (azure-iot-device-mqtt)
var clientFromConnectionString = require('azure-iot-device-http').clientFromConnectionString;
var location = process.env.DEVICE_LOCATION || 'Frankfurt Messe';
var connectionString = process.env.IOTHUB_CONN || YOUR CONNSTR HERE. TAKE IT FROM DeviceExplorer';
// Create an Azure IoT client that will manage the connection to your IoT Hub
// The client is created in the context of an Azure IoT device, which is why
// you use a device-specific connection string.
var client = clientFromConnectionString(connectionString);
var deviceId = device.ConnectionString.parse(connectionString).DeviceId;
// Create a Johnny-Five board instance to represent your Particle Photon
// Board is simply an abstraction of the physical hardware, whether is is a
// Photon, Arduino, Raspberry Pi or other boards.
var board = new five.Board({ port: "COM8" });
// The board.on() executes the anonymous function when the
// board reports back that it is initialized and ready.
board.on("ready", function () {
console.log("Board connected...");
// The SparkFun Weather Shield has two sensors on the I2C bus -
// a humidity sensor (HTU21D) which can provide both humidity and temperature, and a
// barometer (MPL3115A2) which can provide both barometric pressure and humidity.
// Controllers for these are wrapped in a convenient plugin class:
var weather = new Shield({
variant: "ARDUINO", // or variant: "PHOTON",
freq: 1000, // Set the callback frequency to 1-second
elevation: 100 // Go to http://www.WhatIsMyElevation.com to get your current elevation
});
// The weather.on("data", callback) function invokes the anonymous callback function
// whenever the data from the sensor changes (no faster than every 25ms). The anonymous
// function is scoped to the object (e.g. this == the instance of Weather class object).
weather.on("data", function () {
var payload = JSON.stringify({
deviceId: deviceId,
location: location,
// celsius & fahrenheit are averages taken from both sensors on the shield
celsius: this.celsius,
fahrenheit: this.fahrenheit,
relativeHumidity: this.relativeHumidity,
pressure: this.pressure,
feet: this.feet,
meters: this.meters
});
// Create the message based on the payload JSON
var message = new device.Message(payload);
// For debugging purposes, write out the message payload to the console
console.log("Sending message: " + message.getData());
// Send the message to Azure IoT Hub
client.sendEvent(message, printResultFor('send'));
});
});
// Helper function to print results in the console
function printResultFor(op) {
return function printResult(err, res) {
if (err) console.log(op + ' error: ' + err.toString());
};
}
|
To run the code, in already opened command prompt execute : >node app.js
If all works fine, the app will run and produce output as this one:

If your app fails with connection error and you are sure your connection is ok, then it is most likely that AMQP ports 5671 and 5672 are blocked. In that case you will have to switch to http. To do that add dependency to HTTP library instead of amqp one:
"dependencies": {
"azure-iot-device": "latest",
"azure-iot-device-amqp": "latest",
"azure-iot-device-http": "latest",
"johnny-five": "latest",
"j5-sparkfun-weather-shield": "latest"
} |
Additionally you will have to add http package in app.js
var clientFromConnectionString = require('azure-iot-device-http').clientFromConnectionString;
Posted
Feb 25 2016, 11:22 PM
by
Damir Dobric